Hello everyone! Welcome back to another helpful Blog brought to you by Eureka Crystal Beads! Today I’m going to discuss a really simple design technique that’s great for the beginning beader who might be feeling overwhelmed with what to do with all the fun new beads they have. I call this technique FILLING THE GAPS! I touched upon the idea of this briefly in one of my previous YouTube videos, but we had some questions from viewers and wanted to expand upon it!

So to start, you can see that I have a lovely palette of beads in different shapes, sizes, colors, and mediums! This sort of assortment can make some beautiful projects but it can be daunting to know where to start!
First, think about what bead you might want to feature the most – start there! For this project I’m going to start with the 8mm Swarovski pearl in Iridescent Green!

I’ve laid out an odd number of the pearls, already reminiscent of the bracelet I’m creating. It’s often pleasing to the eye to have something in the center – hence the odd number! I suggest starting with the bead you’re most excited about. 🙂
Next, select the next type of bead you’d like to work with. If you aren’t sure which one do use next, stick with whatever is the next largest bead you have. Take those beads and … Fill in the gaps! Place one in between each of your starting beads.

Now, pick a third type of bead and go ahead and fill in THOSE gaps. Again, if you’re not sure which one to pick next, simply go with the next largest bead that you have left.

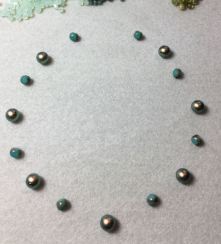
As we start to use smaller beads, or even as we get further along in the design, we don’t have to fill every single gap if we don’t want to. In this image, I’ve started sprinkling in 4mm Swarovski Crystals (here, in Chrysolite Opal!) but only filling in the gaps on either side of the 8mm pearls. Experiment!

Now I’m using the 3mm Fire Polish beads to fill in some of the gaps. Some, not all. I’ve chosen to fill the gaps on either side of the Czech glass beads that are laid out in the design.

Here you can see my finished design laid out! Remember, you can always change and move things around – try different combinations! Nothing is set in stone (pun intended?) yet! However, take comfort in the fact that if you’re using a lovely color palette to begin with – you can’t go wrong. 😉

Start to string up your design. I recommend starting in the center and working your way out. Many times you will find that you laid out more beads than you actually need to complete your desired length.
Below you’ll see that I was able to get to the desired length of my bracelet without needing all of the beads. (The leftovers will make a great little matching pair of earrings!)
Finish up your bracelet with whatever clasp you prefer and you’re all done. A lovely, simple, balanced bracelet design (or make it longer – necklace!) with a design technique to take away some of the stress of a beginner beader. Enjoy!


This is so helpful! I’ve been beading for awhile but usually follow patterns and don’t do much stringing. This will help me use some of the many beads I buy that don’t fit into a pattern on hand. Thanks!
Hi Lorraine! So happy you found this technique helpful 🙂 It’s such an easy design technique that is also SO versatile!!