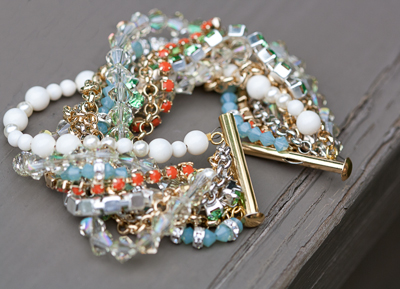
This stylish and fun bracelet is easy to make and has a stunning effect mixing gold and silver colored chains with Swarovski pearls, Swarovski beads and rhinestone cup chain.

Supplies:
1 31mm 5 strand gold plated tube bar clasp
1 length of 3.7mm silver rolo chain
2 lengths of 3.7mm gold rolo chain
1 length of 4.8mm gold rolo chain
1 length of 3mm Coral gold plated rhinestone cup chain
1 length of 4mm Peridot silver plated rhinestone cup chain
2 3mm gold cup chain ends with loops
2 4mm rhodium cup chain ends with loops
4 lengths of Softflex beading wire .014
Several gold crimp beads
30 6mm Crystal Luminous Green Swarovski bicone beads
11 6mm Ivory Swarovski crystal pearls
9 4mm Ivory Swarovski crystal pearls
12 4mm White Swarovski crystal pearls
44 4mm Pacific Opal Swarovski bicone beads
18 4.5mm Silver Crystal rondelles
1 pair of flat-nose pliers
1 pair of round-nose pliers
1 pair of flush chain cutters
Steps:
Begin by taking a measurement of your wrist so that you know the lengths of wire, chain and cup chain that you will need. The bead amounts listed here are for a bracelet for a 6 inch wrist. You may need a few extra beads or have to add jump rings to lengthen the bracelet.
Use the flush chain cutters to cut rolo chain and rhinestone cup chain slightly longer than the circumference of your wrist.

Cut four lengths of Softflex beading wire at least two inches longer than the circumference of your wrist.
Begin with one length of the beading wire and attach it to the top loop on the bar clasp by threading through the loop and securing the wire with a crimp bead.


To secure the wire with a crimp bead, thread through the bead twice (creating a loop) and squish the bead with the flat nose pliers.


Begin threading the 6mm Crystal Luminous Green Swarovski bicone beads on the beading wire, making sure that the first bead or two hide the tail of the wire.


Thread half of your Crystal Luminous Green beads and secure the end in a non permanent way (for example, you can wrap a piece of tape around the end of the strand).
Next, open a jump ring and attach one length of the small gold rolo chain to the same loop on the tube clasp.


I added my chain above the strand of beads because I thought the metal would frame the bracelet nicely but it doesn’t really matter because the bracelet will get all mixed up at the end anyway.
.jpg")
Next, take the length of peridot rhinestone cup chain and the corresponding 4mm silver chain end and attach the chain end to the cup chain securely by carefully folding down the prongs.


Attach the cup chain to the next loop on the tube clasp using another jump ring.

Take the next length of beading wire and attach it to the same loop as the cup chain using a crimp tube as before.
Thread this wire with a mix of the Swarovski pearls in 6mm Ivory, 4mm Ivory and 4mm White in a random pattern.


Secure this strand as before and then attach the small silver rolo chain to the next loop on the clasp using a jump ring as with the chain above.

Use the next length of beading wire to thread the 4mm Pacific Opal beads mixed with the 4.5mm rondelles. The pattern can be random but I used one that was more regular. The number of beads and rondelles you will need will be determined by the pattern you decide to use. Secure the strand as the other beaded strands before.


Next, add the large gold rolo chain to the next loop on the tube clasp using another jump ring.

Attach a 3mm gold chain end to the coral cup chain.


And attach the cup chain to the tube clasp using a jump ring.

Take the final length of beading wire, attach to the last loop on the clasp and string the rest of the Crystal Luminous Green beads. Secure as before.

Attach the second length of gold rolo chain to the same loop using a jump ring and the hard work is finished! Your bracelet is almost done.

Open the tube clasp and lay out the other half on the other end of the bracelet.
Play around with the various strands to achieve the look you desire before attaching the strands to the loops on the other side of the clasp.
I did a loose braid. It’s helpful to already have the chain ends on the cup chain and to even out the lengths of the rolo chain and beaded strands before you do that.


Then go down the line, attaching two strands per loop the same way as on the other side of the clasp.

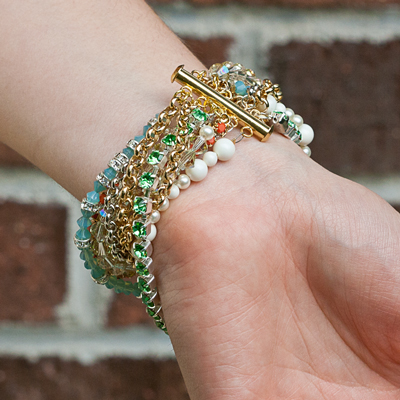
And now you have a beautiful new finished bracelet for a fraction of the cost of buying one.

Each time you wear it and each time you move your wrist, the bracelet will look different. Try the same design with different colors and have a bracelet for every season!


Very Beautiful bracelet love that.
Thank you. We’ll have more. Sign up for a newsletter to get the beading news. Don’t forget to enter Czech Beads giveaway on our facebook page. Winner will be drawn and announced tomorrow!
as a teacher of jewelry making the idea was a good one but the method of making it was wrong. please use crimping pliers for crimping it may just all apart on you.. it’s a two step plier to assure your work is done correctly. Hope this helps you in the future. Chain nose pliers are for making a chain..
Very nice, might try this for my granddaughter.
Beautiful bracelet and thank you for the tutorial!
You’re very welcome!
n i c e
Lovely!