Hello friends! Today I’ve got a fun little BEADED BEAD for you to make using a tubular Netting technique! These great little beads can be strung onto Soft Flex beading wire or wrapped onto head pins! You can have fun playing with many different color combinations. Let’s get started!
**NEWS: Check the Eureka Crystal Beads YouTube channel by the weekend (9/28 or 9/29…) and we’ll have this up as a video as well! 😉
Here’s what you’ll need for 1 beaded bead:
- (6) 3mm Round Swarovski Pearls
- (6) 4mm Round Swarovski Pearls
- (3) 6mm Round Swarovski Pearls
- (72) Size 15 Japanese Seed Beads
- (15) Size 11 Japanese Seed Beads
- (1.5 feet) 6lb FireLine Beading Thread
- Size 12 needle, scissors, and optional – Beader’s Wax.

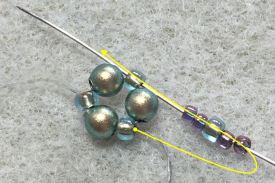
1) Pick up (1) 3mm pearl and (1) size 11 seed beads. Repeat 2 more times for a total of 6 alternating beads.

2) Sew the beads into a circle and tie into a square knot. Travel through a few more beads to pull the knot into the circle. Make sure to end this step exiting from a seed bead.
3) Pick up (2) size 15 seed beads, (1) size 11 seed bead, and (2) more size 15 seed beads. Pass through the next size 11 seed bead in your beaded ring.

4) Repeat step 3 (2) more times, and then step-up by going through the first 3 beads you added at the beginning of step 3. You should end this step by coming out of the first size 11 seed added in step 3.

5) Pick up (1) 4mm pearl and pass through the next size 11 seed bead that you added in step 4.

6) Repeat step 5 (2) more times, adding an additional (2) 4mm pearls. End by exiting the same size 11 seed bead as you started with in step 5.

7) Pick up (4) size 15 seed beads, (1) size 11 seed bead, and (4) more size 15 seed beads. Pass though the next size 11 seed bead in your ring, which is in between the next 2 4mm pearls.

8) Repeat step 7 (2) more times, and then step-up by going through the first 5 beads you added at the beginning of step 7. You should end this step by coming out of the first size 11 seed added in step 7.

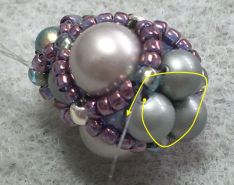
9) Pick up (1) 6mm pearl and pass through the next size 11 seed bead that you added in step 8.

10) Repeat step 9 (2) more times, adding an additional (2) 6mm pearls. End by exiting the same size 11 seed bead as you started with in step 9.

11) Pick up (4) size 15 seed beads, (1) size 11 seed bead, and (4) size 15 seed beads. Pass through the next size 11 seed bead in your beaded ring, which is in between the next 2 pearls.

12) Repeat step 11 (2) more times, and then step-up by going through the first 5 beads you added at the beginning of step 11. You should end this step by coming out of the first size 11 seed added in step 11.
13) Repeat steps 5/6, adding in (3) 4mm pearls

14) Repeat steps 3/4, adding in the (3) 2/1/2 groups of seed beads.

15) Go through the size 11 seed beads present to add in your (3) 3mm pearls. Now, simply weave out your thread, tying smoe half-hitch knots along the way and you’re done! 🙂


That’s all she wrote folks! You’ll find many different variations of this sort of Netted Beaded bead style all over, play with different combinations and colors to see what you can come up with! Try creating it with 3mm, 4mm, and 6mm Swarovski Crystal Bicones for a dazzling look as well!
Until next time, signing off from Eureka Crystal Beads.com!
-Leah
