
This pattern by Kathy Simonds shows the simplicity of incorporating the Czech Mates Two-Hole beads into your designs. Here we use Czech Two Hole Tiles and Czech Two Hole Bricks to make a simple ladder bracelet or the perfect base for any number of fanciful designs.
Here is what you will need:
- 13 Czech Tiles
- 52 Czech Bricks
- 130 Size 11 Seed Beads in color A
- 234 Size 11 Seed Beads in color B
- Clasps
- Cut a length of thread as long as is comfortable to work with. Additional thread will need to be added.
Steps:

1. Sew through one of the Tile holes, then the hole parallel, leaving a 3 inch tail (Fig. 1).
2. Sew through the first hole again, then tie a half-hitch knot around the thread from step 1 (Fig. 2).
3. Sew through the second hole again and tighten up the slack. The thread will be parallel to the tail (Fig. 3).
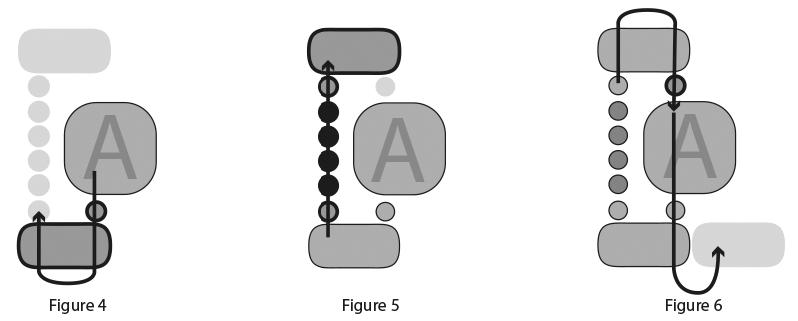
4. After securing your Tile, backtrack one row before continuing. Pick up one seed bead (color A), one Brick bead and pass through the other side of the Brick (Fig. 4).
5. Pick up one seed bead (color A), four seed beads (color B), one seed bead (color A) and one Brick. This creates the outside ladder rung (Fig. 5).
6. Pass through the other side of the Brick, pick up one seed bead (A) and pass back through the Tile, the first seed bead (A) and the Brick (Fig. 6).
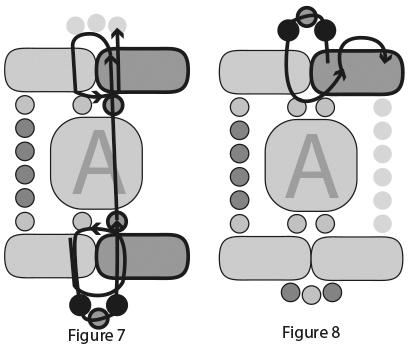
7. Pick up one Brick and pass back through the hole in the last Brick you just came out of to pull tightly to secure before picking up one seed bead (B), one seed bead (A) and one seed bead (B) and pass back through the newly added Brick, pick up one seed bead (A), pass back through the Tile, pick up one seed bead (A) and one Brick and pass back through the Brick added in step 5 the Brick added in this step and securing together (Fig. 7).
8. Add the fringe by picking up one seed bead (B), one seed bead (A), one seed bead (B) and pass back through both of the Bricks again and then pass through the other Brick hole on the last Brick added in step 7 (Fig. 8).
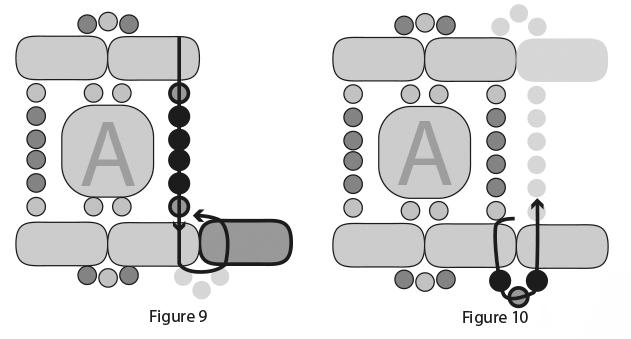
9. Pick up one seed bead (A), four seed beads (B), one seed bead (A) and pass through the other side of the Brick and pick up one Brick and secure by passing back through the Brick next to it (Fig. 9).
10. Add fringe by picking up one seed bead (B), one seed bead (A) and one seed bead (B) and pass back through the Brick (Fig. 10).
11. Pick up one seed bead (A), four seed beads (B), one seed bead (A) and one Brick, pass back through the Brick and the new Brick securing them together; pick up one seed bead (B), one seed bead (A) and one seed bead (B) before passing back through both Bricks and pass through the other side of the last Brick (Fig. 11).
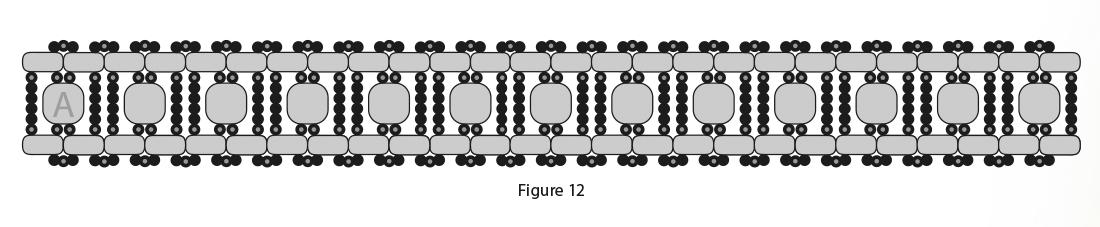
12. Pick up one seed bead (A) and one Tile and continue steps 7 to 12 until you have 13 sets. The first and last Bricks will not have any fringe on the outside edges (Fig. 12).
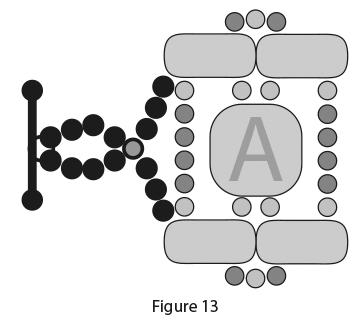
13. Lastly, to add your clasps and toggles pass back through the last Brick and pick up three seed beads (B), one seed bead (A), four seed beads (B), Clasp, four seed beads (B), pass back through the seed beads (A), pick up three seed beads (B) and pass back through the Brick on the opposite side. Repeat this to attach the other side of the clasp to the bracelet (Fig. 13 & 14).

Your bracelet is now ready to wear. Enjoy!
![]()

Classy
Thread Fancy Thank you! These could be casual or dress up.
Beautiful!! I plan to try this one!!
Thanks Peggy! We’re so glad you like it. Stay tuned for more!
What gorgeous bracelets and they don’t look that hard to do. Thanks for this beautiful idea !
Thanks so much!